ChatGPT Images 2.0 Tattoo Prompts: Design Ink That Works
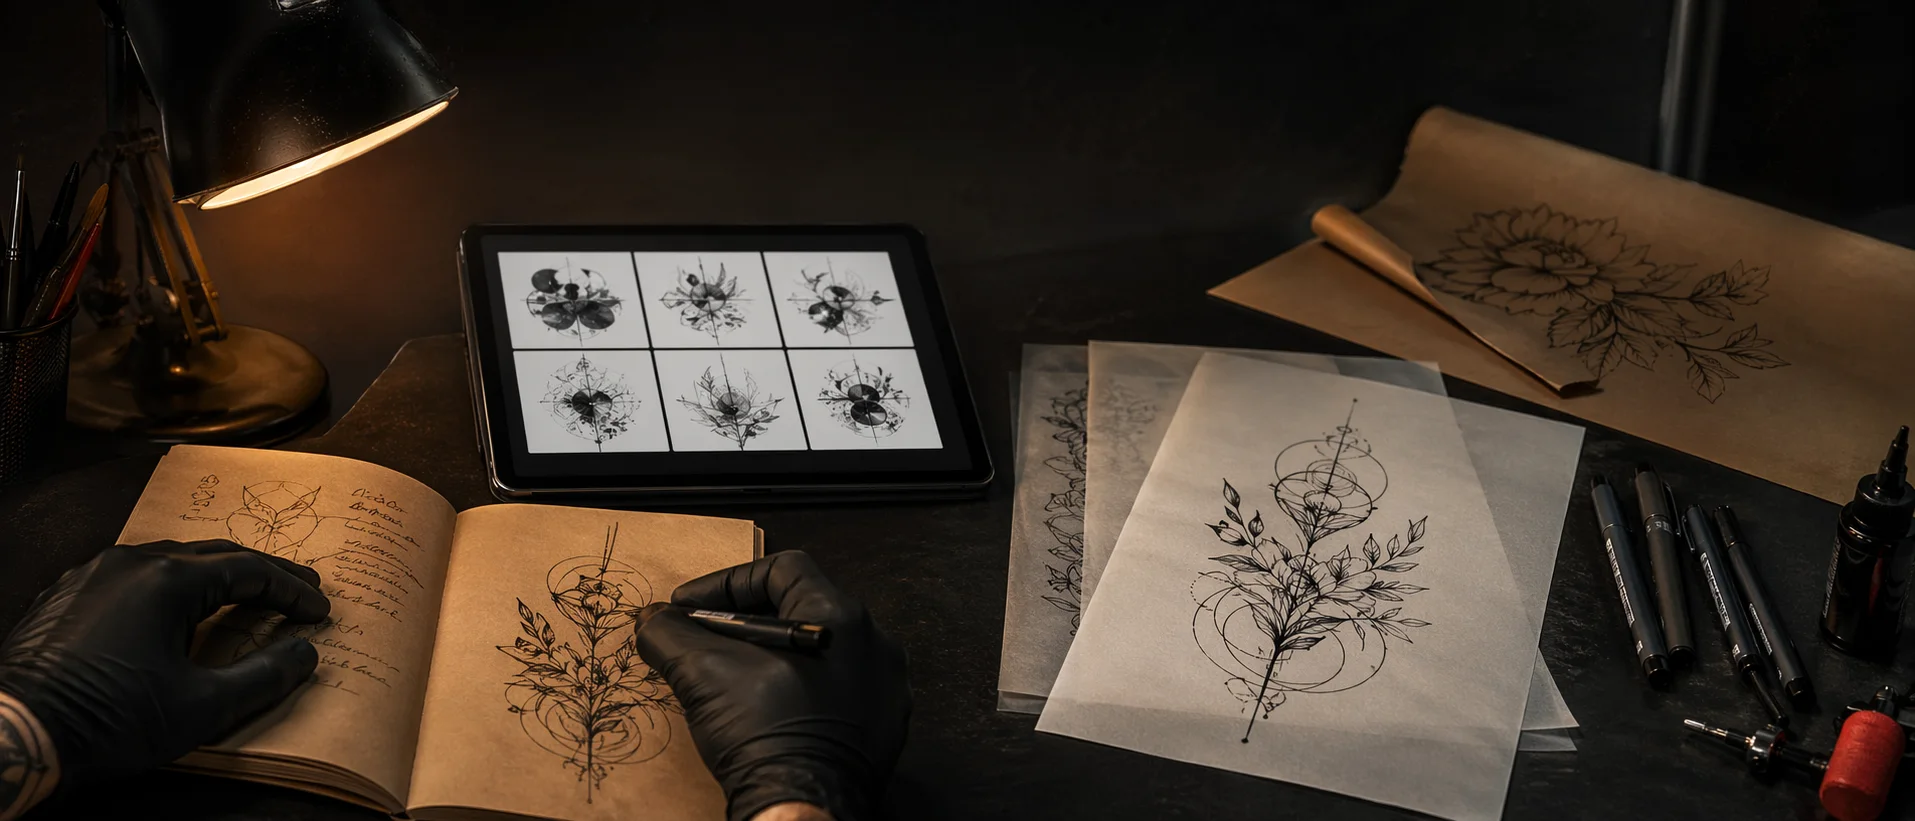
ChatGPT Images 2.0 landed fast and loud. When OpenAI introduced it on April 21, 2026, the internet immediately did what it always does with a better image model: product mockups, portraits, memes, fantasy scenes, and a thousand "try this prompt" threads. If you work around tattoos, the interesting part is not the hype. It is what this kind of image model changes for the messy early stage of tattoo design.
A tattoo starts long before the needle. It starts with a half-clear idea: a moth but not gothic, a dragon but not aggressive, a quote but not Pinterest script, a memorial piece that feels quiet instead of heavy. The hard part is getting that idea out of your head in a form another person can understand. A strong image model can help, but only if the prompt understands tattoos as tattoos, not as pretty pictures.
This guide is written for that gap. Use it whether you are testing ChatGPT Images 2.0, GPT Image 2, OpenInk, or another AI tattoo generator. OpenInk is not an OpenAI product and this article is not pretending otherwise. The point is simpler: if you learn to write prompts that respect linework, placement, scale, skin, and stencil needs, every tool gives you more useful drafts.
Why ChatGPT Images 2.0 Is A Big Deal For Tattoo Prompts
Most image-model upgrades matter because they make images prettier. Tattoo people need something more specific. A prettier image can still be a bad tattoo reference. The best-looking AI output in the room may have impossible micro-detail, unreadable shapes, mismatched symbolism, or shading that would turn muddy after healing.
The reason people are excited about ChatGPT Images 2.0 is that it appears to follow complex instructions with more patience. That matters for tattoo work because good tattoo prompts are not just "a wolf in blackwork." They are instructions about body placement, line weight, negative space, background density, cultural style, composition, and what the artist should simplify later.
For a tattoo, the prompt has to answer questions like these:
- What is the main subject, and what should stay secondary?
- Where on the body is this meant to sit?
- Is it a tiny wrist tattoo, a forearm piece, a half sleeve, or a back piece?
- Should the result be a finished illustration, a stencil-style draft, or a placement preview?
- What line weight will still read after healing?
- Which details are meaningful, and which ones are just decorative noise?
- Does the design need open skin breaks so it does not become a dark patch?
That is why a tattoo prompt deserves more care than a normal image prompt. You are not just asking for a picture. You are asking for a conversation starter that a real artist can translate into skin.
A Pretty AI Image Is Not Automatically Tattooable
This is the first thing I would tell a client in a studio: do not fall in love with the AI image too quickly. Fall in love with the direction, then test whether it can survive the tattoo process.
AI image models love tiny ornamental detail. They love extra leaves, extra smoke, extra hair strands, extra jewelry, extra everything. On a phone screen that looks rich. On skin it can collapse. Ink spreads slightly as it heals, skin moves, sun exposure changes contrast, and small shapes that looked crisp on paper may blur into one another after a few years.
A tattoo-ready prompt should push the model toward clarity. It should ask for bigger shapes, cleaner edges, practical negative space, and a hierarchy of detail. The eye should know what the tattoo is at three distances: across the room, in conversation, and close up.
Here is the difference:
Weak prompt:
"Beautiful moon moth tattoo with flowers, detailed, magical, elegant."
Better tattoo prompt:
"Moon moth tattoo design for outer forearm, fine line black ink, wings open in a vertical composition, two peonies framing the lower wing edges, clean negative space around the body, medium line weight, minimal dot shading, stencil-friendly, no background, no tiny decorative filigree."
The second prompt is less dreamy, but it gives the model something a tattoo artist can actually use. It names the placement. It controls detail. It says where the flowers go. It asks for negative space. It tells the model not to bury the design in filler.
The Tattoo Prompt Formula
Use this formula when you want an AI tattoo draft that is more than decoration:
Subject + meaning + style + placement + scale + line weight + composition + negative space + stencil needs + avoid list
You do not need all ten parts every time, but the more permanent the tattoo, the more of them you should include.
Subject. Name the thing clearly. "Snake wrapped around a dagger" is better than "dark dangerous tattoo."
Meaning. Add the emotional center when it matters. "Memorial for my father, quiet and protective" will shape the image differently from "bold biker-style tribute."
Style. Use tattoo styles, not only art styles: fine line, blackwork, neo-traditional, Japanese Irezumi, black and grey realism, dotwork, ornamental, Chicano, lettering, woodcut, micro-realism.
Placement. Forearm, sternum, ribs, shoulder cap, upper back, thigh, calf, wrist, spine. Placement changes composition.
Scale. Say whether it is palm-sized, full forearm, half sleeve, chest panel, or back piece. Scale decides how much detail survives.
Line weight. Thin, medium, bold, mixed. For small tattoos, ask for fewer details and more breathing room.
Composition. Vertical, wraparound, centered, diagonal, circular, symmetrical, following the collarbone, moving with the muscle.
Negative space. Ask for open skin breaks, clean gaps, and no overfilled background.
Stencil needs. If you want something an artist can redraw quickly, say "stencil-friendly," "clean black linework," "no painterly gradients."
Avoid list. Tell the model what not to do: no text, no extra symbols, no wings, no skulls, no random mandalas, no hyper-detailed background.
Prompt Set 1: Fine Line Botanical Tattoo
Copy this:
"Fine line botanical tattoo design for inner forearm, single wild rose stem with two leaves and one unopened bud, black ink only, natural asymmetry, medium-thin line weight, light dot shading only at the base of petals, clean negative space between leaves, stencil-friendly, no background, no watercolor, no extra flowers."
Why it works: fine line tattoos fail when the prompt asks for too many tiny flowers. This prompt keeps the subject narrow and tells the model where detail belongs. One rose, two leaves, one bud. Enough to feel alive, not enough to turn into lace.
Where it can go wrong: if you plan to make this smaller than three inches, reduce the leaf veins and petal folds. A fine line tattoo can be delicate, but it still needs room to heal.
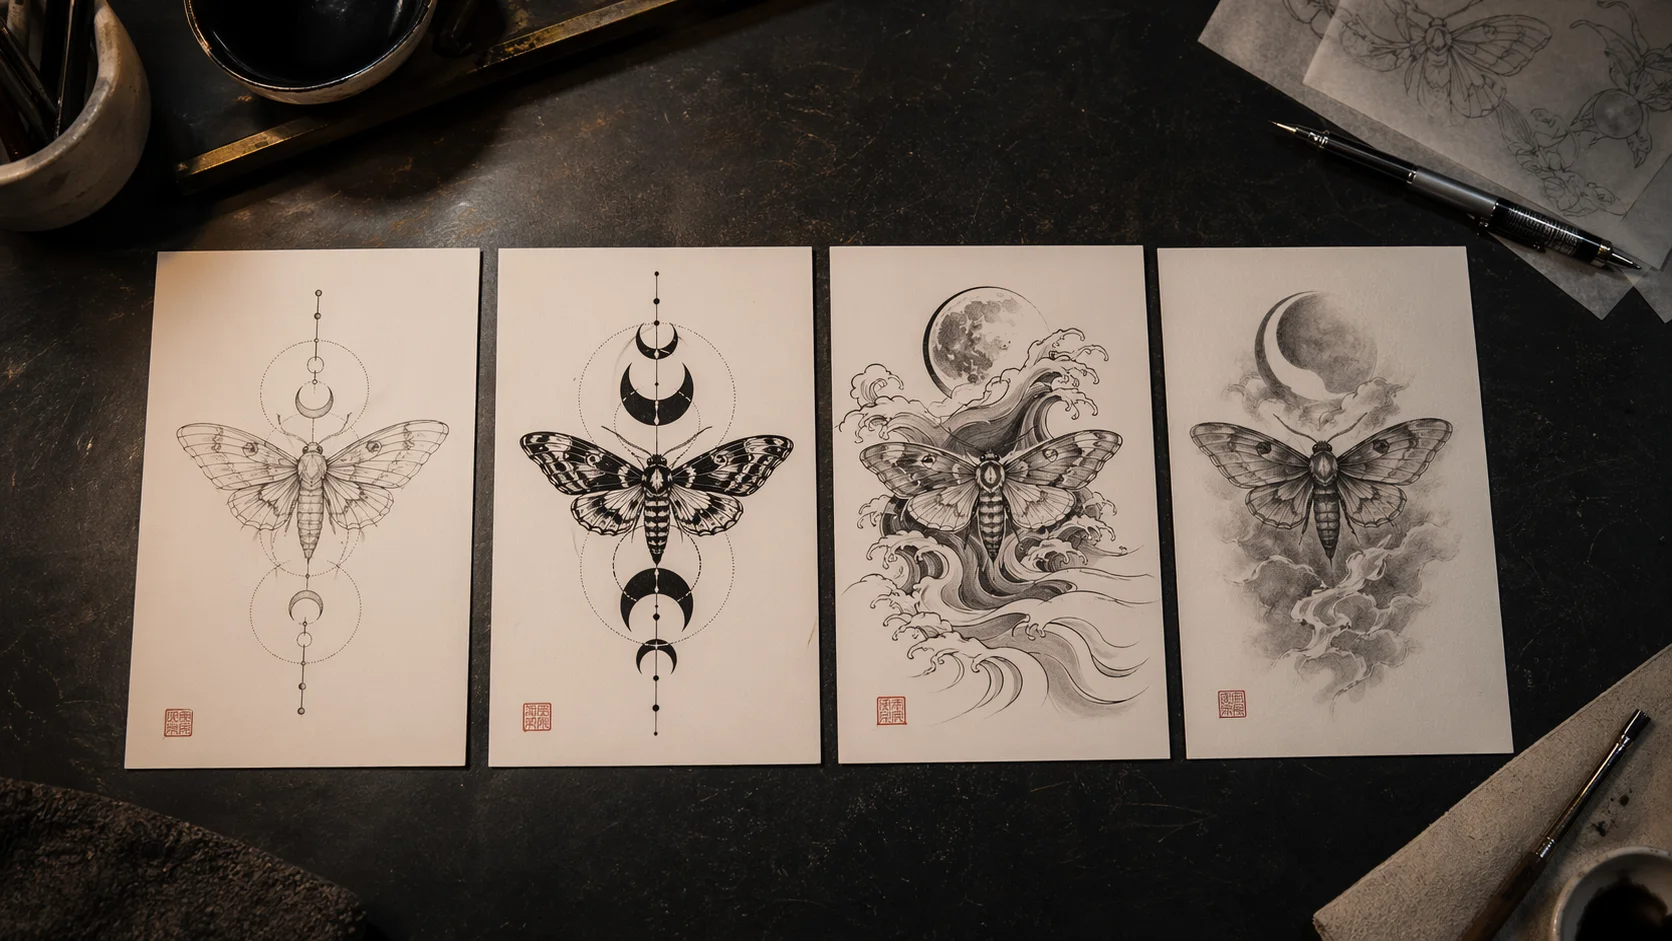
Prompt Set 2: Blackwork Moth With Negative Space
Copy this:
"Blackwork moth tattoo for upper arm, wings open in a strong symmetrical shape, bold outer silhouette, interior wing patterns made with clean negative space instead of tiny lines, small crescent moon above the body, no background, high contrast black ink, tattoo flash style, readable from a distance."
Why it works: blackwork needs discipline. Instead of asking for "detailed wings," this prompt tells the model to build detail through open skin breaks. That is what keeps a dark tattoo readable after healing.
Where it can go wrong: do not let the model fill every wing panel with texture. If the draft looks like black velvet from across the room, ask for larger negative-space shapes.
Prompt Set 3: Japanese Dragon Sleeve Concept
Copy this:
"Japanese Irezumi dragon tattoo concept for full sleeve, three-clawed dragon coiling from shoulder to wrist, head near upper arm, body wrapping with the arm's natural curve, wind bars and waves as background, bold black outlines, limited red and gold accents, clear scale pattern but not microscopic, traditional composition, no wings, no Western fantasy dragon."
Why it works: Japanese dragon prompts need cultural and anatomical clarity. "Dragon tattoo" is too vague. This prompt says Irezumi, three claws, no wings, wind bars, waves, sleeve flow. It keeps the model from drifting into a Western fantasy creature.
Where it can go wrong: AI often overpacks Japanese backgrounds. Ask for "background supports the dragon, not equal detail everywhere" if the first draft feels crowded.
Prompt Set 4: Lettering Tattoo That Will Still Read
Copy this:
"Minimal lettering tattoo for collarbone, phrase 'still here' in custom serif lettering, all lowercase, letters at least 5 mm tall, generous spacing, soft hand-drawn imperfections, black ink, no decorative flourishes crossing the letters, no background, stencil-ready."
Why it works: lettering prompts need physical rules. The model may not measure millimeters, but mentioning letter height and spacing pushes it toward readable forms. The prompt also blocks flourishes that cut through letters.
Where it can go wrong: AI image tools still struggle with exact text. Use the output for mood and placement, then have your artist or a lettering specialist redraw the final letters. Triple-check spelling before stencil day.
Prompt Set 5: Memorial Tattoo Without Heavy Cliches
Copy this:
"Quiet memorial tattoo for left ribs, small lighthouse with two soft waves and one north star, black and grey fine line, calm protective mood, no dates, no banner, no angel wings, no portrait, gentle negative space, designed as a personal private piece, stencil-friendly."
Why it works: memorial tattoos can become crowded with symbols because the feeling is big. This prompt protects the emotional tone by using fewer elements and a clear mood. It says what to exclude: dates, banners, wings, portraits.
Where it can go wrong: if the lighthouse becomes too illustrative, ask for "simpler silhouette, fewer windows, stronger outline." Rib tattoos also move with breathing, so keep the design clean.
Prompt Set 6: Cover-Up Direction
Copy this:
"Tattoo cover-up concept for an old small black name tattoo on outer wrist, new design is a blackwork olive branch wrapping diagonally over the old area, bold leaves placed to hide dark strokes, natural stem flow, enough black density for coverage but open skin around the edges, no full blackout, no lettering."
Why it works: cover-ups are not normal tattoos. The prompt must mention the old tattoo's darkness and location, and it must tell the new design where to carry density. The goal is not just beauty; it is coverage.
Where it can go wrong: never trust AI alone for cover-up feasibility. A real artist needs to see the old ink, age, scar tissue, and skin tone. Use this as a direction board, not a final answer.
Prompt Set 7: Matching Tattoos That Are Related, Not Identical
Copy this:
"Pair of matching tattoo concepts for two siblings, same visual language but not identical, one small sunfish and one small moonfish, fine line black ink, each palm-sized, simple curved body shapes, shared tiny star detail, no names, no dates, clean negative space, easy to place on ankle or inner arm."
Why it works: matching tattoos are better when they share a language instead of copying exactly. This prompt gives each person their own piece while keeping the pair connected.
Where it can go wrong: if the two designs drift too far apart, ask for "same line weight, same scale, same star detail, mirrored composition."
Prompt Set 8: Stencil-First Prompt
Copy this:
"Stencil-ready tattoo linework only, black lines on plain white background, ornamental snake and peony design for outer thigh, bold main contour, medium interior lines, no shading, no gradients, no grey wash, open gaps between scales and petals, clean transfer-style drawing."
Why it works: sometimes you do not want a polished picture. You want something closer to a stencil. This prompt removes shading and asks for transfer-style linework.
Where it can go wrong: the model may still add grey texture. Repeat "linework only, no shading" and ask for a simpler redraw if needed.
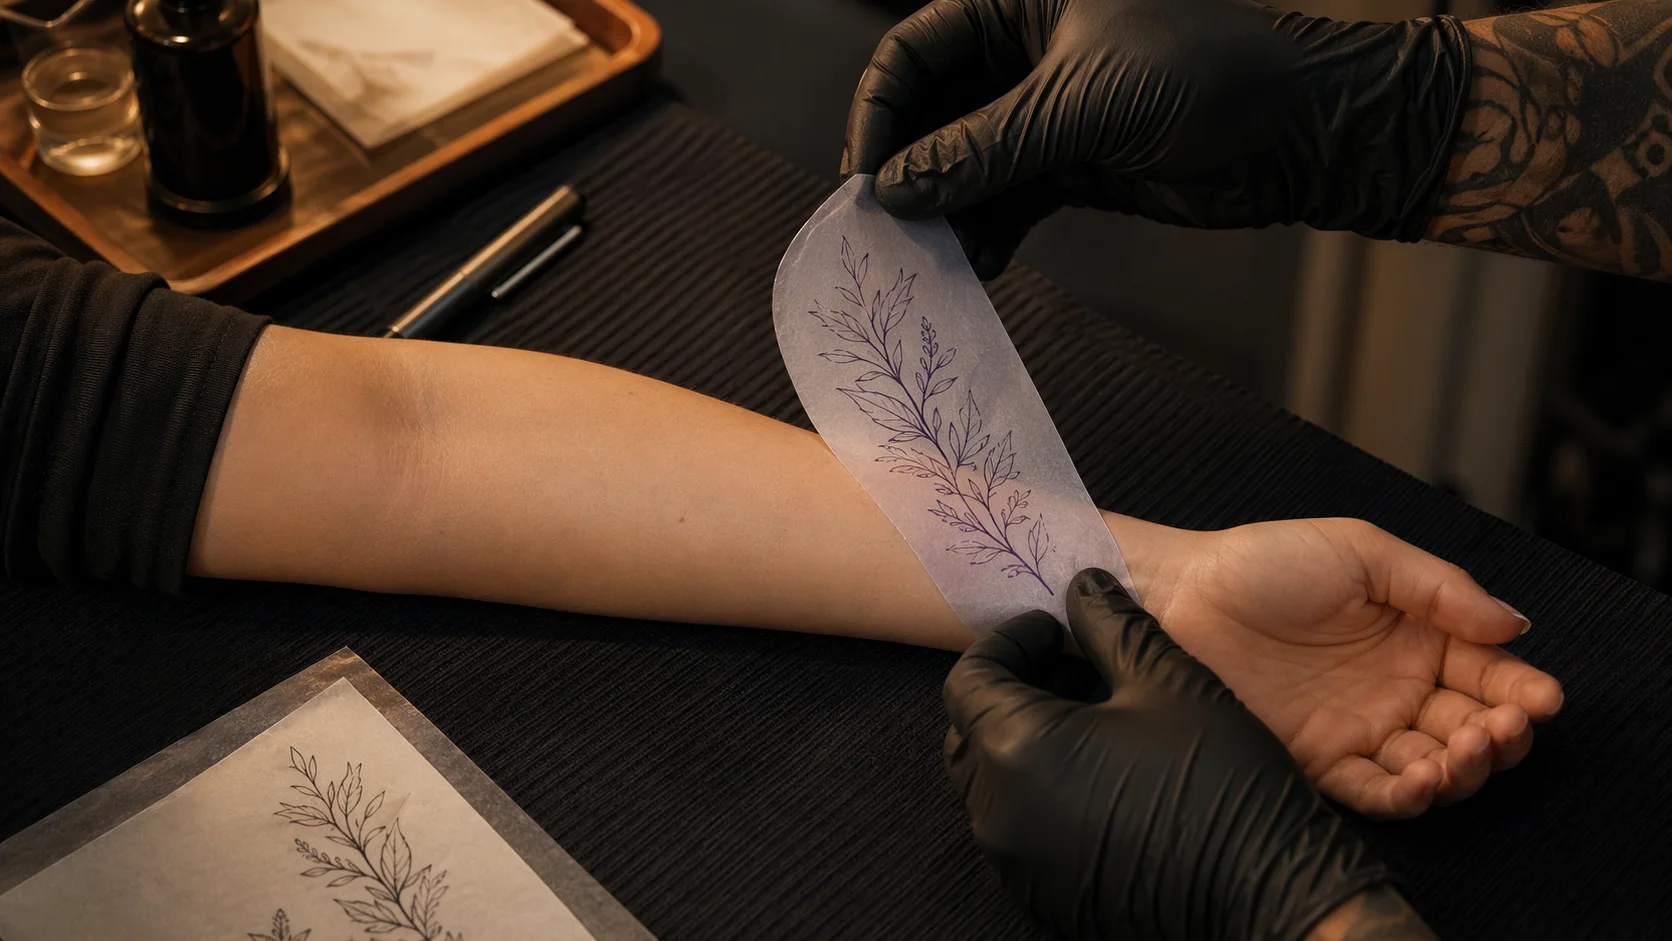
Prompt Set 9: Placement Preview
Copy this:
"Tattoo placement preview on a real forearm, clean botanical linework stencil positioned along the outer forearm, design follows the arm's natural length, realistic skin texture, professional tattoo consultation photo, no needle, no blood, no finished ink, no face, no readable text."
Why it works: placement previews are for scale and flow, not final artwork. This prompt asks for a stencil on skin, not a finished tattoo. That helps you see whether the design fights the body or sits naturally.
Where it can go wrong: AI may invent unrealistic skin or warped anatomy. Treat placement previews as a rough check. Your artist still needs to resize and fit the stencil in person.
Prompt Set 10: Photo-To-Tattoo Translation
Copy this:
"Turn a reference photo of my dog into a tattoo design, black and grey illustrative style, focus on the head shape and expression, simplify fur into larger shaded planes, keep the eyes clear, no full background, small collar tag as the only extra detail, suitable for upper arm at 5 inches."
Why it works: photo-to-tattoo prompts should ask for translation, not copying. Fur, hair, and tiny photo detail need to become tattoo shapes. The prompt tells the model what matters: head shape, expression, eyes.
Where it can go wrong: if the image becomes too realistic for the size, ask for "less fur texture, bigger shadow shapes, stronger outline."
Prompt Set 11: Chicano-Inspired Black And Grey Piece
Copy this:
"Black and grey Chicano-inspired tattoo concept for upper arm, lowrider rose and soft script ribbon without readable words, smooth grey shading, strong black outline on rose edges, balanced highlights, respectful studio flash feel, no religious figures, no gang symbols, no realistic portrait."
Why it works: style references need boundaries. Chicano tattooing has a deep visual language, and lazy prompts can wander into symbols the wearer did not intend. This prompt names what is allowed and what is not.
Where it can go wrong: if the ribbon becomes fake text, ask for blank ribbon shapes only. Exact lettering should be designed separately.
Prompt Set 12: Minimal Symbol Tattoo
Copy this:
"Tiny symbolic tattoo for inner wrist, single broken circle with one small sprout growing through the opening, black ink, simple geometric line, no shading, no extra dots, no mandala, no background, must remain readable at 2 cm wide."
Why it works: tiny tattoos need restraint. The prompt says "single" and "no extra" several times because AI likes to decorate. At two centimeters, every added mark matters.
Where it can go wrong: if the sprout is too detailed, reduce it to two leaves. Tiny does not mean weak; it means edited.
Prompt Set 13: Style Variations From One Idea
Copy this:
"Create four tattoo design variations from the same idea: a moth circling a small moon. Variation 1 fine line, variation 2 blackwork, variation 3 neo-traditional, variation 4 dotwork ornamental. Keep the same vertical forearm placement and palm-sized scale. No text, no background, clear differences in line weight and shading."
Why it works: this is how you test taste before committing. You are not asking the model to find the one perfect design. You are asking it to show you four lanes so you can feel which one belongs on your body.
Where it can go wrong: the model may change the subject too much across variations. Ask it to keep the moth silhouette and moon position consistent.
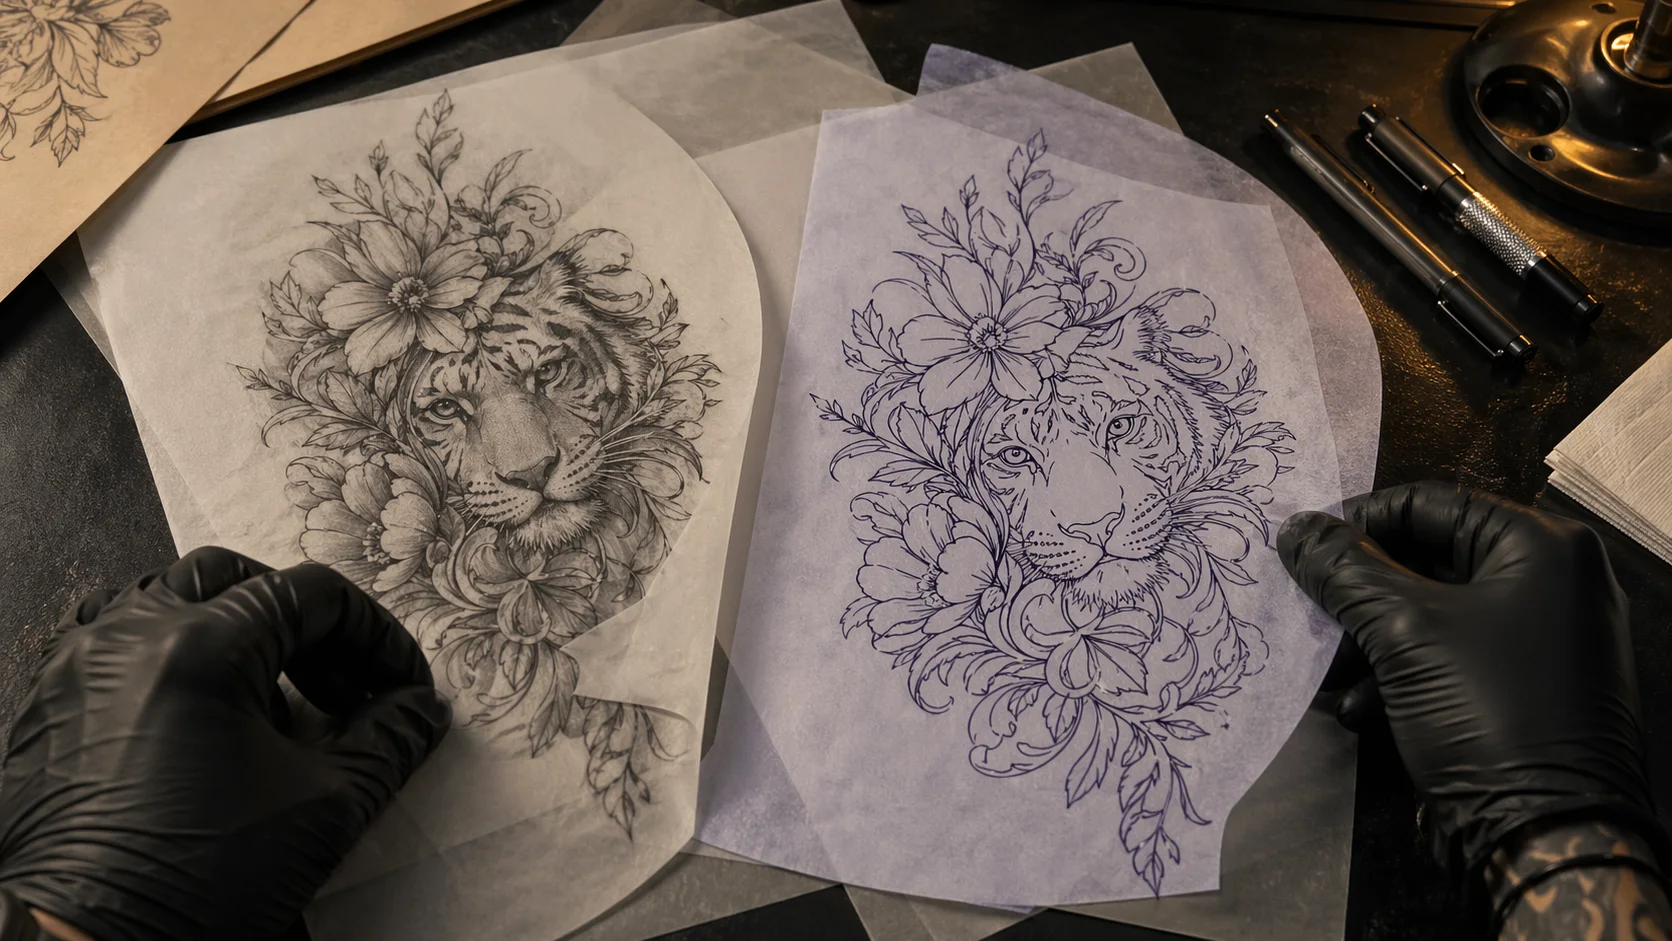
Prompt Set 14: Artist Consultation Sheet
Copy this:
"Tattoo consultation reference sheet, one main blackwork raven tattoo concept for shoulder blade, plus three small detail studies: beak shape, feather spacing, and wing curve. Clean white background, ink sketch style, no text labels, practical reference for a tattoo artist, not a finished poster."
Why it works: an artist does not only need a pretty final image. They need decisions. A consultation sheet can show the main direction and the parts you care about most.
Where it can go wrong: if it becomes a polished fantasy poster, ask for "rough studio reference sheet, fewer effects, more practical line decisions."
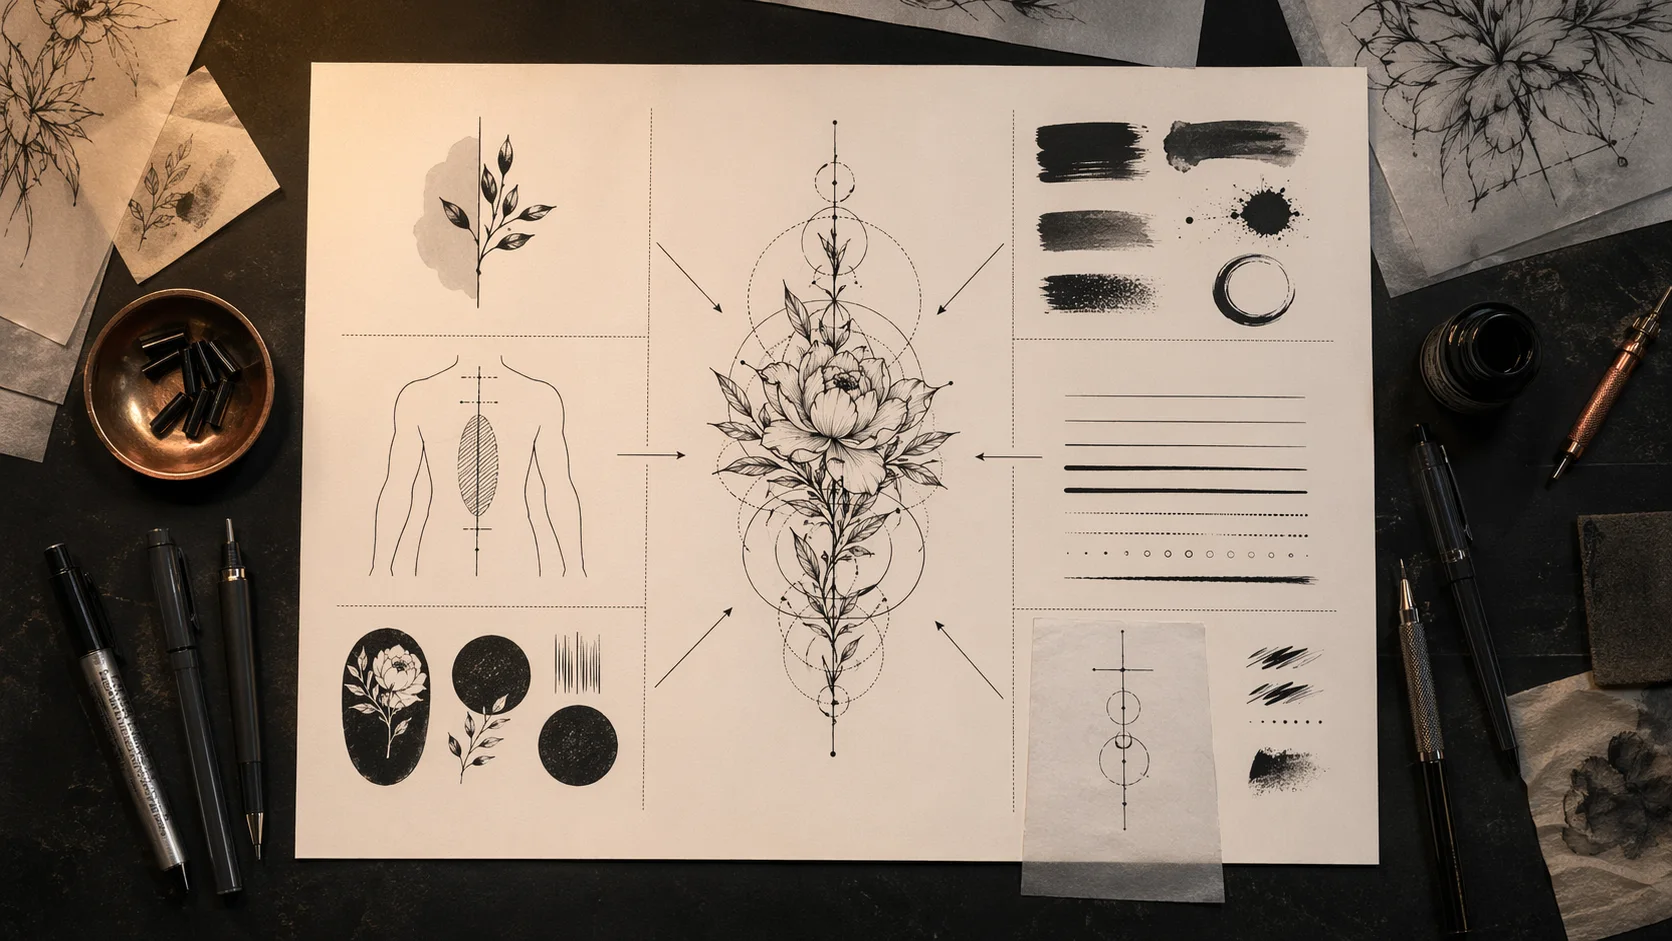
What To Do After You Generate A Draft
Once you have a few good AI tattoo drafts, slow down. This is where people rush and lose the benefit.
First, pick the direction, not the image. Get clear on what you actually like in it: the subject, the line weight, the calm mood, the placement, the way the design leaves skin open. Name the parts that matter so your artist can preserve them.
Second, simplify. If the draft has ten flowers, try three. If the background is dense, remove half of it. If the face has tiny details, enlarge the piece or reduce the detail. A tattoo that looks slightly simpler on screen often looks stronger on skin.
Third, test placement. A design that looks balanced on a flat image can feel wrong on ribs, wrist, shoulder, or knee. Use a placement preview, print the design, or ask your artist to mock up the stencil size.
Fourth, prepare a short note for your tattoo artist:
- What the tattoo means
- Which parts of the AI draft you want to keep
- Which parts are flexible
- Preferred placement and size
- Any symbols you do not want
- Whether you want a stencil-style redraw, a custom final design, or only a consultation starting point
This makes you a better client. It also gives your artist space to do the real work: turning a direction into a tattoo that fits your body and ages well.
Using OpenInk For The Next Pass
You can use any tool that helps you think clearly. If you want a tattoo-specific workflow, OpenInk is built around that early design stage: text-to-tattoo generation, reference-image exploration, stencil extraction, and InkCanvas refinement.
Start with one of the prompts above in the OpenInk AI Tattoo Generator. Then make the prompt more personal. Add the placement. Remove the symbols that do not belong. Try a cleaner stencil version. Save the drafts that feel closest, not just the ones that look most dramatic.
Before you bring anything to a studio, remember this: the AI draft is not the tattoo. It is the sketch you bring to the table. A good tattoo artist will adjust line weight, simplify details, fit the stencil to your body, and make judgment calls that an image model cannot make from a screen.
That is not a weakness. That is the point. Use ChatGPT Images 2.0, GPT Image 2, OpenInk, or any AI tattoo generator to get the idea out of your head. Then let a real artist make it wearable.
Turn this guide into a tattoo draft
Keep the motif from this article, then test style, placement, and line weight before you talk with an artist.